Pages

Tuesday, October 27, 2009

Daring Bakers: Macarons

The 2009 October Daring Bakers’ challenge was brought to us by Ami S. She chose macarons from Claudia Fleming’s The Last Course: The Desserts of Gramercy Tavern as the challenge recipe.
At first, I wasn't going to participate in this month's challenge because macarons are made primarily of two ingredients I do not like: nuts (i.e., almond flour) and meringue. However, because I've always been curious as to if i could ever create the coveted "feet" on the first try, I went along with the challenge and decided I would just give these French cookies to my students and colleagues afterward.

Now I can say proudly that I've made macarons and even saw the "feet" on my first and second attempts. The second batch didn't come out as well as the first one, but they tasted much better. While both batches didn't come out perfectly, they were good enough for my first and second attempts. I have posted some process photos below for the chocolate macarons:

I put the almond flour and powdered sugar in my (NEW!!) food processor...

I noticed how much I like the juxtaposition of onyx and silver on my techie stuff and kitchen appliances. My stand mixer, laptop, desktop (not pictured), and food processor are all the same color!


...and sifted the mixture twice and still got bumpy macarons. Oh well.
I added about 15 grams of cocoa powder and then sifted again.
Beat the egg whites until you reach stiff peaks.

Fold the almond mixture into the stiff egg whites in 3 installments. Keep folding until the batter looks like magma or lava. Do not under- or over-stir!
Put the mixture into a piping bag. I didn't use a tip the first time around. With the second batch, I used a 1/2-inch rounded tip. I didn't see any difference in the outcome.

See? The pre-baked macarons look pretty good (shape-wise) without the aid of a tip. I'm not that great of a "piper", but I was pretty satisfied with how they were turning out at this point, despite the bumpy texture.
For the first batch, I made chocolate macarons with coffee buttercream and Mexican chocolate ganache. I didn't like the taste of the chocolate ones because I could taste the almond flavor. The buttercream and ganache were divine though!
For the second batch, I made a "cinnamon roll" macaron because I was craving cinnamon rolls. I added a blend of cinnamon (~10 grams) and brown sugar (~10grams) to the almond flour and powdered sugar mix. Then I made my go-to cream cheese frosting that I use for my favorite cinnamon rolls.
I, of course, just had to take a bite of the macaron for the blog (sorry for the many bad photos!), and that was when I realized how yummy these were. I have to admit that these were really, really good. I also added a little bit of Mexican chocolate ganache in the middle of a few of the macarons, but I didn't like that variety very much. It was overkill.

CHALLENGE AFTERTHOUGHTS: I don't regret participating in this month's challenge; it was a good experience, and I can now say I've made macarons. I doubt I'll ever make them again, even though the cinnamon roll macarons were very good. I have a bunch of them sitting in my freezer, and I plan to give them away to my students on Monday.

*UPDATE* I gave them away today and my students and colleagues LOVED both varieties. Some came back for seconds. I got rid of them all very quickly. I was surprised at how no one had heard of macarons, especially my colleagues who have traveled to Western Europe many of times.
I personally think they were pretty easy to make even though mine didn't come out perfectly. If I were to make them again, I would need to find a better way to sift the dry mixture. Anyway, I enjoyed studying many videos and food blogs relating to macarons, including Tartelette's (she won't be referenced to very often by other bloggers in this challenge HAH!) and Mad Baker's blogs. Thanks for this challenge, Ami! Also, thanks to all the food bloggers and youtube cooks with their tips, photos, videos, and blogs about macarons. Don't forget to check out what the other Daring Bakers did for this challenge!

adapted from Tartelette

1 cup sugar
1/3 cup water
2 large eggs
3 sticks (1 1/2 cups) unsalted butter, softened
3 tablespoons instant espresso powder dissolved in 1 tablespoon hot water (I used instant coffee)

In a small heavy saucepan set over medium heat, dissolve the sugar in the water. While stirring bring the mixture to a boil, stop stirring, and continue to cook until it registers 235-240°F on a candy thermometer.

In the bowl of a stand mixer with the whisk attachment or with a hand held beater beat the eggs until they are frothy. Add the sugar syrup in a thin stream, beating, and beat the mixture until it is cool. (The mixture should change to a pale white, thick mixture. You will be have to beat the mixture for 5-10 minutes in order to reach that point.)

Change to the paddle attachment and add in the room-temperature butter, 1 tablespoon at a time, the espresso or coffee mixture, and beat the buttercream until it is combined well. Leave at room temperature so it will be easier to spread.

Cream Cheese Filling

1 (3 ounce) package cream cheese, softened
1/4 cup butter, softened
1 1/2 cups confectioners' or icing sugar
1/2 teaspoon vanilla extract
1/8 teaspoon salt

Beat together cream cheese and butter. Add the confectioners' sugar, vanilla extract and salt.

Sunday, October 25, 2009

Double Chocolate Toffee Ice Cream

I had five leftover egg yolks so I decided to make ice cream with them because I couldn't think of any other egg-yolk recipes I like. The recipe calls for four egg yolks, but I put in all five. I'm tired of ice cream, but I figured I could give it away to my neighbors. *UPDATE* I tried this ice cream again the next day, and it was much better! I guess I was just not in the mood for ice cream that day. Needless to say, this ice cream won't be making it to my neighbors as originally planned. hehe

I have made this chocolate ice cream before, but this time I added toffee bits for some crunch. This chocolate ice cream is very rich.

Anyway, if you're in the mood for a rich chocolate ice cream, make this soon, no matter if it's cold or hot outside.

Double Chocolate Toffee Ice Cream
adapted
from Williams Sonoma Collection: Ice Cream and My Baking Addiction

Ingredients:
1 1/2 cups whole milk (I didn't have whole milk, so I used a combo of skim and half-n-half)
1 1/2 cups heavy cream
4 large egg yolks
1/2 cup sugar
2 tablespoons unsweetened cocoa powder (I used Hershey's)
pinch of salt
6 ounces bittersweet or semi-sweet chocolate, coarsely chopped (I used semi-sweet chocolate chips)
2 teaspoons vanilla extract

Add-in:
1/2 cup toffee bits

Method:
1. In a heavy 2 quart saucepan, combine the milk and 1 cup of the cream. Cook over medium heat until bubbles form around the edges of the pan, about 5-7 minutes (I waited until there was a film on top of the milk).

2. Meanwhile, combine the egg yolks, sugar, cocoa, salt and remaining 1/2 cup of cream in a bowl. Whisk until the mixture is smooth and the sugar begins to dissolve (It never reached the smooth stage for me. Just wait until it is well-mixed).

3. Remove the milk mixture from the heat. Gradually whisk about 1/2 cup of the hot milk mixture into the egg mixture, whisking constantly, until smooth. Pour the egg mixture into the saucepan. Cook over medium heat, stirring constantly with a wooden spoon and keeping the custard at a low simmer, until it is thick enough to coat the back of the spoon and leaves a clear trail when a finger is drawn through it, 4-6 minutes (My custard seemed to be the right consistency as soon as I put everything in the pot! I still continued to heat it for 4-5 minutes). Do not let the custard boil. Put the 6 ounces of chopped chocolate (or chocolate chips) in a heat proof bowl and pour the hot custard over it (I suggest putting only half of the mixture over the chips, wait a minute or two, then stir the chocolate. After the chocolate has melted, add the rest of the custard). Stir until the chocolate melts and the custard is smooth. Strain the custard through a fine-mesh sieve into a bowl (if you like little chunks of chocolate in your ice cream, I would skip this step, unless you think there are a few curdled egg bits in your custard). Add vanilla and stir to combine.

4. Place the bowl into a larger bowl partially filled with ice cubes and water. Stir occasionally until cool. Cover with plastic wrap, pressing it directly on the surface of the custard to prevent a skin from forming. Refrigerate until chilled, at least 3 hours or up to 24 hours.

5. Pour the custard into an ice cream maker and freeze according to the manufacturer's instructions. Stir in toffee bits. Transfer the ice cream to freezer-safe container. Cover and freeze until firm, at least 3 hours or up to 3 days before serving.

Saturday, October 24, 2009

Apple Breakfast Puffs

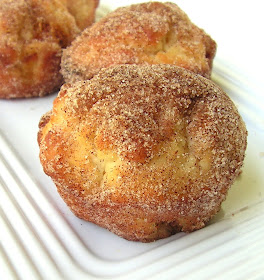
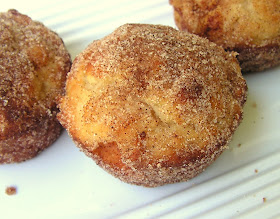
Pioneer Woman calls these delightful muffins "French Breakfast Puffs" because she got the recipe from her French teacher in school. So, since I added apples to these addicting balls of bread and didn't get these from a French teacher (well, not directly), I renamed them "Apple Breakfast Puffs". I bet these would also be good with other types of fruit like blueberries or cranberries!

Although they are called "Breakfast Puffs", you will want to eat them all day long. They are so good. The soft, warm interior of the puffs is so comforting. The apples add another dimension to these puffs making them even more comforting. And the butter and cinnamon topping? O-M-G!! So good! These puffs are so soft. Other tasters of these puffs suggest making them in mini muffin pans. I don't have such a pan, so I can only imagine how good those versions taste.

Not only did I add chopped apples, I also used buttermilk instead of milk to make it richer. They were perfect and very quick to make. I halved the recipe, but I posted the full recipe below. I wish I would have thought to take a photo of the inside of the puffs. I guess I will have to make them again in the near future in order to do that. You know, I have to make these sacrifices for my readers. :D

Apple Breakfast Puffs
adapted by Pioneer Woman
(This recipe can be easily halved, but these are so good you may want to use the full version below and freeze the leftovers in a ziploc, freezer bag.)
3 cups AP flour
3 teaspoons baking powder
1 teaspoon salt
1/2 teaspoon ground nutmeg
1 cup sugar
2/3 cup shortening (Crisco)
2 eggs
1 cup milk (I used buttermilk)
1 1/2 cups sugar
3 teaspoons cinnamon
2 sticks butter
1 apple (peeled, cored, and diced into small cubes)

Preheat oven to 350 degrees. Lightly grease 12 muffin cups (I used "Baker's Joy", like Pioneer Woman). Stir together flour, baking powder, salt, and nutmeg. Whisk mixture, and set aside.

In a different bowl (I used the stand mixer bowl), cream together sugar and shortening, then add eggs and mix. Add flour mixture and buttermilk alternately to creamed mixture, beating (until the flour is mostly incorporated) after each addition and ending with the flour. Fold in chopped apples. (Make sure you do not overmix so that the puffs do not come out tough.)

Fill prepared muffin cups 2/3 full. Bake at 350 for 20-25 minutes or until golden. In a bowl, melt 1 1/2 sticks butter. In a separate bowl, combine sugar and cinnamon. Dip baked muffins in butter, coating thoroughly, then coat with cinnamon-sugar mixture.

Tuesday, October 20, 2009

"On a Diet" Take 1,000,000: Chicken and Baked Brown Rice

As I mentioned in the previous post, I was on a diet last year. I got off of the diet and then tried to get back on again this year, but it didn't work out for very long.

Now I'm trying this whole diet/lifestyle thing again. I have low metabolism and a high desire for cooking and baking good, rich, less healthy food, so yeah...not a good combination.

Also, I have the opposite problem of many overweight people. I don't eat enough, or I eat at the wrong times. Many people think all overweight or obese people gain weight just from eating too much and not working out. However, some people gain weight because they don't eat enough and when they do eat, they may eat one big meal in the day. Then the body stores that food differently than if one were to eat more regularly, even with regular exercise. That is one of the reasons I have low metabolism. In fact, I often have to remind myself to eat almost every day, but you would never guess that by looking at me. I have been working on eating more regularly for years.

Anyway, in order to jump start my 1,000,000th attempt at losing weight, I prepared this meal, which consisted of baked brown rice, "grilled" chicken breasts, and broccoli. The brown rice didn't turn out right because I didn't cook it long enough. I put it back in the oven after taking these photos, so now the rice is done and tastes better. I prepared the chicken in a cast-iron skillet over a little bit of olive oil and margarine (I reserve my butter for baked goods to save money). Instead of using fresh broccoli, I took my leftover frozen broccoli out of the freezer and microwaved some of it in a little bit of water.

Aside from the rice (before I fixed it), everything was great. Don't let my mistake on the rice deter you from making the baked brown rice, though. I've made this rice many of times. It is the only way I like my brown rice now. I also allow it to cook in 2 cups of chicken broth + 1/2 cup of water.

Wish me good luck on my diet/lifestyle change!*

1 1/2 cups brown rice, medium or short grain
2 1/2 cups water (I use chicken broth)
1 tablespoon unsalted butter (I use margarine)
1 teaspoon kosher salt

Preheat the oven to 375 degrees F.

Place the rice into an 8-inch square glass baking dish (If using a metal baking dish, add 5-10 mins).

Bring the water (or chicken broth), butter, and salt just to a boil in a kettle or covered saucepan. Once the water boils, pour it over the rice, stir to combine, and cover the dish tightly with heavy-duty aluminum foil. Bake on the middle rack of the oven for 1 hour.

After 1 hour, remove cover and fluff the rice with a fork. Serve immediately. (or the next day, you could use the leftover brown rice in healthy shrimp fried rice!)

*Even though I will be on a diet for awhile (let's hope!), I plan to continue making desserts every so often because I enjoy baking more than cooking. I will just be sure to give most of it to my friends, students, and family hehe.

Thursday, October 8, 2009

Coffee Ice Cream

Last April, I was on a diet and decided to stop drinking soda and coffee. More than one year later, I am no longer on that diet, but I still do not drink soda. At times, I miss drinking it, especially when I see others opening a new, cold can or bottle of Coke. *shudders* :)

What about the coffee, you ask? Well, I decided last month to start drinking coffee again because I was having trouble staying awake and focusing on my school work.

In the past, when I would study, I would order various, sugar-laden, cold, mixed, froo-froo, coffee drinks, like a frappuccino with whipped cream on top. When I was an undergrad, in fact, I would drink 1 to 2 venti-sized portions of that stuff a day! So, even though I've allowed coffee to come back into my life, I have decided to continue staying away from those cold, sweet, coffee drinks and focus on drinking the hot, plain, simple variety at home.

In the past, any hot drink with coffee would cause me to fall asleep, just like hot milk or chocolate. In fact, I would drink coffee at night just to help me sleep. Anyway, now that I've started drinking regular, hot coffee again, I've noticed that it causes me to be more alert in the mornings, but it wears off later. I guess I will have to drink more during the day, or just eat this yummy, coffee ice cream!
I know this dessert goes against what I stated before about the frappuccino-type drinks, but I've always wanted to try out this recipe, and I won't be making it often. Also, I'm still not spending 4-10 dollars a day at various coffee houses.

I found this recipe in an ice cream recipe book my mother bought for me at a Half Price Bookstore for approximately 4 dollars. Please make this ice cream ASAP! It is amazingly good and refreshing. Make sure you eat it within 2-3 days of making it because the texture changes quickly. I guess you could add honey or if you drink alcohol, you could add a few teaspoons of that to make the ice cream stay soft for a longer period of time.

I added some Ibarra chocolate that was leftover from my Mexican Chocolate Ice Cream and some more instant coffee bean crystals. The crunchiness that comes from those add-ins are perfect. YUM!

Coffee Ice Cream
adapted from Ice Cream!


2/3 cup (150ml) espresso coffee OR 2 tsp instant coffee dissolved in 2/3 cup (150ml) boiling water
2/3 cup (150ml) whole milk
1/2 cup (100g) light brown sugar
5 large egg yolks
1 1/4 cups (300ml) heavy cream
1 tsp vanilla extract (I added this)

Optional add-ins:
1/4 cup (50g) coarsely ground coffee beans into ice cream just before freezing
1/4 cup (50g) chopped chocolate or Mexican chocolate (I put in the latter)

Combine the coffee and milk, and allow it to cool slightly

In a heatproof bowl, beat the sugar and egg yolks, using an electric (or wire whisk), until thick and pale.

Stir in the milk mixture and place the bowl over a saucepan of simmering water.

Continue stirring until the mixture is thick enough to coat the back of a wooden spoon (my spoon was coated from the beginning, so I just cooked the liquid for about 5 minutes).

Remove from the heat; cover, and allow to cool.

Stir in the heavy cream (and vanilla extract) and churn in an ice cream maker, according to the instructions. (I chilled my mixture overnight to ensure that everything would be cold. You could also refrigerate the custard for 4 hours. I don't suggest putting it in the maker at the point indicated in the book because the mixture will still be warm.)

Serve immediately, or transfer to a freezer container; cover the surface directly with waxed paper or foil, and put in the freezer. (I place the churned mixture into two or three covered, Tupperware containers so that the texture of the ice cream won't be affected as much when I take it in and out of the freezer.)

Chicken Fried Steak and Mashed Potatoes

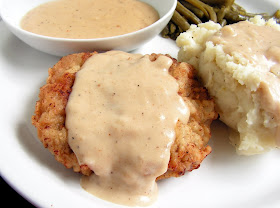
I had some cubed steak sitting in the freezer for a little over a week reserved just for this meal. I finally took it out the day before yesterday so that it could defrost in the refrigerator. This was my first time to make chicken fried steak, so I was excited about trying this out.
So far, I've been able to recreate all my favorite meals that I used to depend on getting from various restaurants. This chicken fried steak is now another meal to add to that list.
It was perfect and easy to make. So easy that I didn't need to depend on a recipe. I just seasoned the flour to my liking, made the egg dip, and did everything else.
I did look up some recipes to make sure I was on the right track, but I didn't need to print them out or bring the laptop to the kitchen.
I just confirmed any doubts and went on and started cooking.

One tip I found out about was that once you have dipped the meat in the flour, egg, and then flour again, you should let it sit on wax paper for 5-10 minutes so that the coating stays on once you place it in the hot oil.


Everything was perfect.

The gravy was so creamy and tasted better than that found in restaurants.

The steak was so good and flavorful.

The green beans were good, but I had put a little bit too much salt on them, so I just ate them with potatoes.

The mashed potatoes were the perfect texture and had the right amount of seasoning. The mashed potatoes came from one potato. The photo shows half of the portion I made. I was surprised at how much you can get out of one potato. You could easily make 2-4 portions from one potato!

Anyway, I'll stop jabbering and let you get to making this wonderful, unforgettable dish.
Even though I didn't follow a strict recipe, I have posted the recipe (with minor adaptations) from Allrecipes.com.

Bom apetite! Bon appétit! ¡Buen provecho! Buon appetito!

HAPPY THANKSGIVING, CANADA!!!
BONNE ACTION DE GR
ÂCES!!!
(Monday, Oct. 12)

Chicken Fried Steak and Milk Gravy Gravy
adapted from various recipes on the internet, including allrecipes.com

2 cups shortening, lard, or vegetable oil (for frying)
2-4 cube steaks
Lawry's seasoning salt
1-2 eggs, beaten
1/2 cup buttermilk (or 1/2 cup milk + 1 Tbsp lemon juice)
salt and pepper to taste
1/4 - 1/2 teaspoon garlic powder
1 cup all-purpose flour
1/4 cup all-purpose flour
1 quart milk
salt and pepper to taste

In a large, heavy skillet, heat 1/2 inch shortening to 350-360 degrees F (185 degrees C).

While the shortening, lard, or oil is heating, prepare cutlets. First, season the steaks with seasoning salt and pepper on both sides. Then in a shallow bowl, beat together egg, buttermilk, salt and pepper.

In another shallow dish, mix together garlic powder, seasoning salt, pepper and 1 cup flour.

Dip cutlets in flour, turning to evenly coat both sides. Dip in egg mixture, coating both sides, then in flour mixture once again.
Allow coated meat to sit for 5-10 minutes on wax paper.

Place cutlets in heated shortening, lard, or oil. Cook until golden brown (about 4-5 minutes), turning once. Transfer to a plate lined with paper towels. Repeat with remaining cutlets.

Milk Gravy:
Drain grease, reserving 1/2 cup.
Using the reserved drippings in the pan, prepare gravy over medium heat. Blend in 1/4 cup flour (I used the leftover, seasoned flour from coating the meat. If you don't want to use that flour, then use 1/4 cup of new flour.) to form a paste. Gradually add milk to desired consistency, stirring constantly. For a thicker gravy add less milk; for a thinner gravy, stir in more. Heat through, and season with salt and pepper to taste. Serve over chicken fried steak.

Mashed Potato (small portion)
Yield 2-4 servings

water
1 potato
salt
pepper
half-n-half
2 Tbsp butter

Boil water. Peel potato, cut in big chunks (4-8 chunks). Place in boiling water for 20-25 minutes (until tender and almost breaks when fork is inserted).

Turn off heat. Drain potato chunks. Place saucepan back on hot stove. Mash potato chunks. Add butter and stir with masher. Then add enough half-n-half until desired consistency (1 Tbsp at a time). Add salt and pepper to taste.

Green Beans

1 can of green beans (drained) or frozen/fresh green beans
1-2 Tbsp butter
salt and pepper to taste

Cook beans in small saucepan. Add butter and seasoning. Cook for 5-10 minutes.